Building a scrolling game in Scratch may sound intimidating, but it doesn’t have to be. In this fun step-by-step tutorial, we will show you and your child how to make a scrolling game on Scratch quickly, using more logic and less blocks.
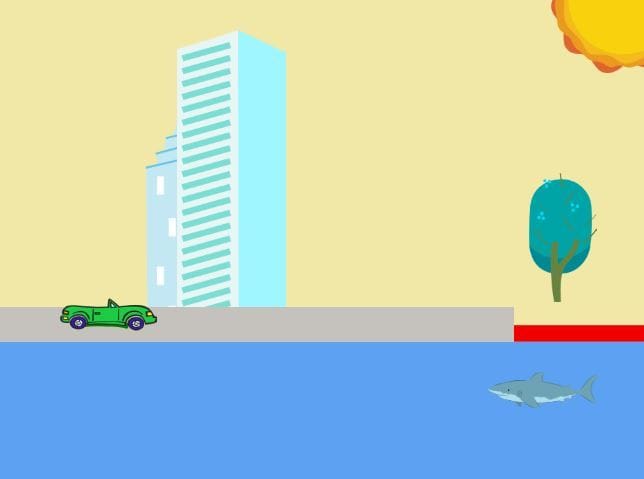
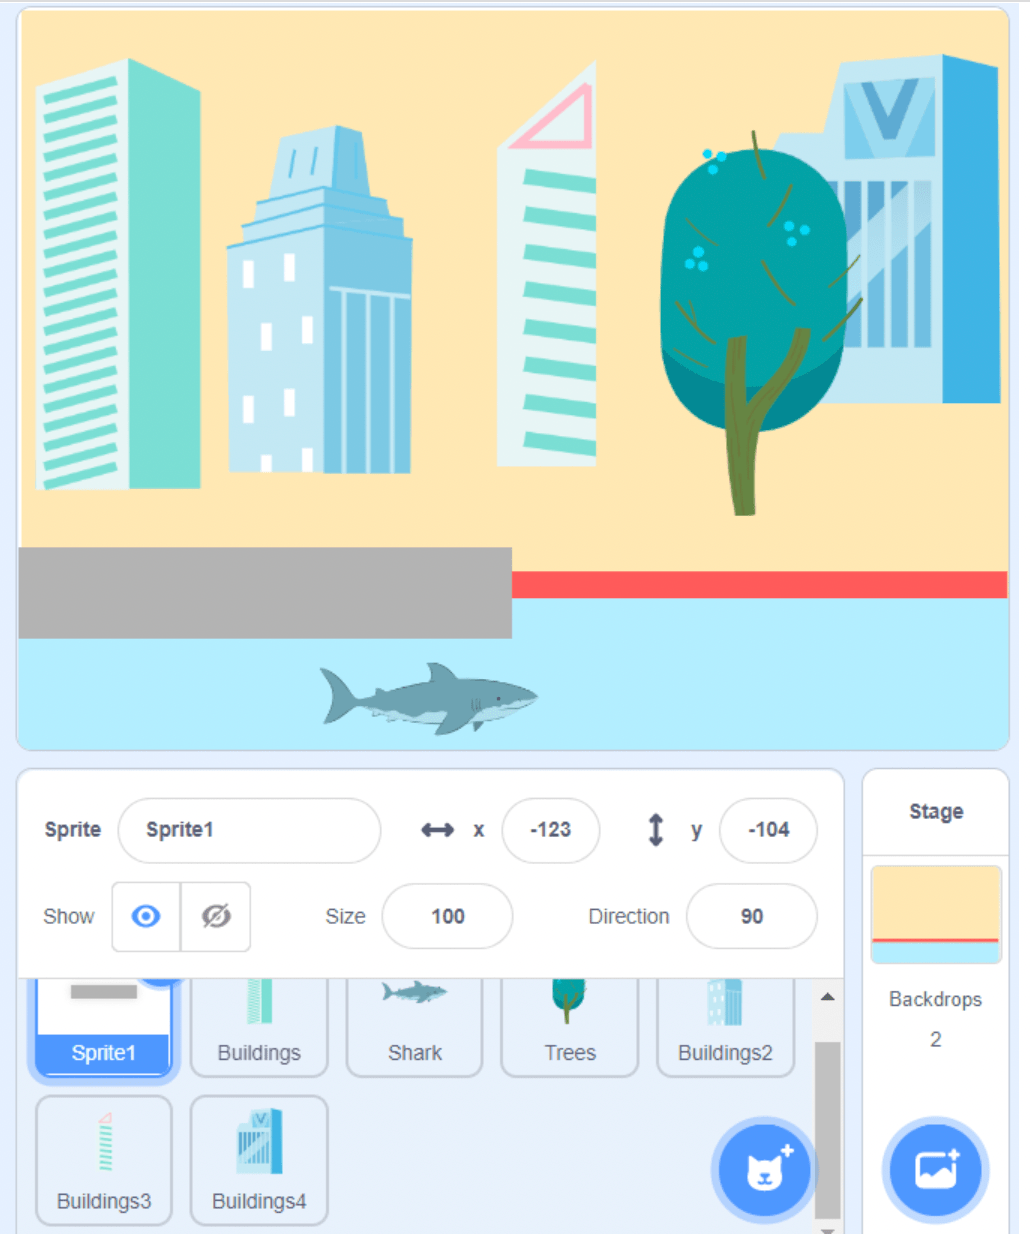
Our scrolling game revolves around a car, which will be controlled by the player; and a tricky pathway that the car is supposed to stay on in order to continue rolling. The player can control the car to avoid obstacles, but if they fall in the Shark water – game over!
Additionally, we will use right, left, and up arrow key to control the car’s position in this game. The goal is to utilize the three keys in order to stay out of the “red zone” which appears whenever one pathway ends and the new one begins. The player must pay close attention to the road and take swift action in order to stay afloat.
To add an extra touch to the animation of the game, we will add a few sprites to the background to make our scrolling game even more dynamic. We will use cars and sharks but students are more then welcome to put their own spin on it! They can edit the sprites and make them their own, or choose different ones entirely!
To make even more cool Scratch games, check out our award-winning Game Building class and our free Scratch class designed by professionals from Google, Stanford, and MIT, and taught live by expert instructors.
Check out upcoming free computer science events for teens led by tech experts: past events have featured guests from Pixar, NASA, Intel, and more.
Start by logging into your Scratch account here.
STEP 1: Create a “pathway” Sprite, using the Paint option.
Instead of clicking on the Sprite icon that takes us to the Sprite library, we are going to move our mouse pointer to hover over it, and then select Paint to create our own Sprite. This action takes us to the Costumes tab where we will click on Convert to Bitmap and “Fill” to choose the color. To save time, use Rectangle tool and then left-click and press down on mouse, and start to drag your mouse pointer from left to right. We want to make our Sprite appear around the center of the canvas. This is going to be our roadway – so feel free to design it as you see fit!
STEP 2: Create a backdrop using Paint and add layers.
Similarly, we are going to skip the Backdrop Library by selecting the “Paint” option once the mouse pointer is hovered over Backdrop icon (lower right corner). Once in Backdrops tab, click Fill to select a desirable background color, and then click on Rectangle tool. Left click and hold your mouse in upper left corner of the screen, then drag and release it in the right bottom corner. We now have our first/base layer. Use the same technique to add our second and third layer. Just be sure to deselect “outline”.
Remember, the red line will be the losing point in the game. We’ll use the blue layer for our shark Sprite.

STEP 3: Import the reset of the Sprites and add a second backdrop.
Add a second backdrop which will be used for our “Game Over” message. We can either get it from the Backdrop Library or we can make our own. You can add text to a backdrop to say game over or end of game.
Next, choose Buildings, Shark, and Trees Sprites from the Sprite Library. Once we have selected all three Sprites, right-click and duplicate the Buildings Sprite four times. One by one, click on the Costumes tab and choose a different costume for each (building-a, building-b, building-c, etc.).
All four Buildings Sprites should display a different design. Drag and place your buildings and the tree a few inches above the red line and spaced apart from one another. Drag and place the shark at the bottom of the screen (on the blue layer) and resize it from 100 to 50 by clicking inside of the Size bubble. Finally, drag and place your custom-made pathway Sprite on the left of the stage, positioned directly on top of the red line
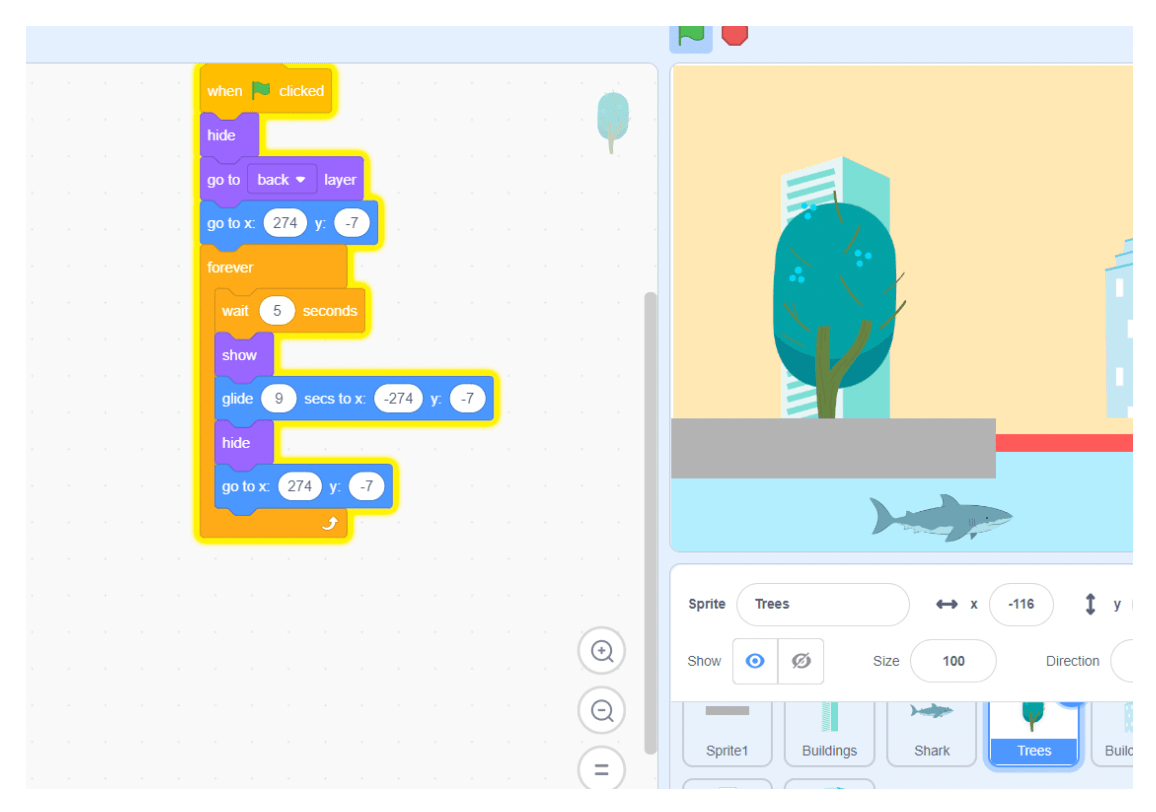
STEP 4: Coding time! Make your background Sprites “scrolly”.
The idea is to have an “in-transit” view of our game or actually see it moving. The car will eventually be placed on the pathway, and as it drives, surrounding objects like trees and buildings will move toward the car from right to left to simulate forward motion. We will use our Trees Sprite to demonstrate how to program this movement, and then we will apply the exact same concept to all the Buildings Sprites.
To achieve this, we will manipulate the x-axis, which represents the horizontal plane of our coordinate system. In Scratch, the center is 0, positions to the right are positive (up to +240), and positions to the left are negative (down to -240). Because we want objects to scroll backwards (from right to left), we will start our background Sprites on the right side (around x: 240) and glide them to the left side (around x: -240). Once they reach the far-left limit, we will use the “hide” block, teleport them back to the right side, and “show” them again to restart the loop. To prevent the buildings and trees from overlapping and piling up, customize the “wait” block times for each Sprite while keeping their glide speed uniform (e.g., 9 seconds).
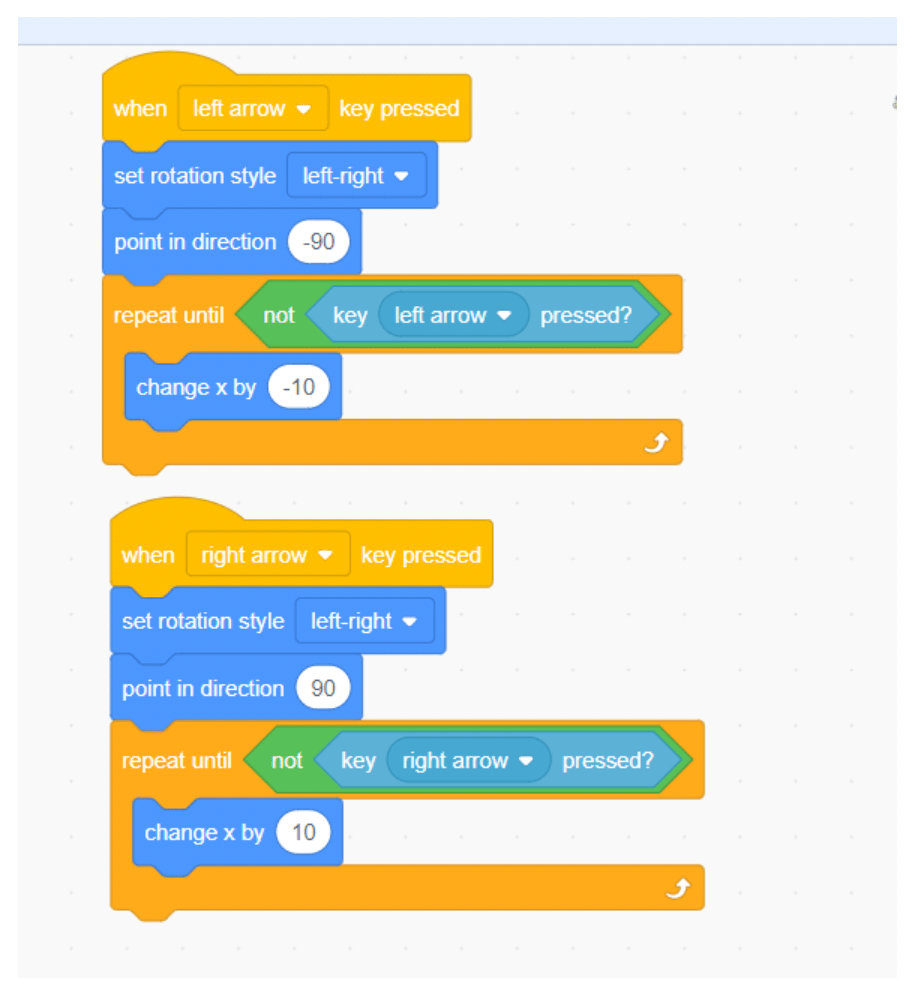
STEP 5: Add the car Sprite and use left/right arrow keys to move it.
Now that we have set our stage and have our background all set up, it is time to work on our car Sprite. Select a car (or other vehicle) of choice from the Sprite Library and resize it to fit inside of our path sprite. Be sure that it is also inline with the red layer, so that we can end the game when the path is pulled from under the car – hence the reason for player to stay vigilant and make the car “jump” when it is time to.
There are four important concepts in terms of code for the car:
1. Turn to the right and move in that direction when the right arrow key is pressed
2. Turn to the left and move in that direction when the left arrow key is pressed
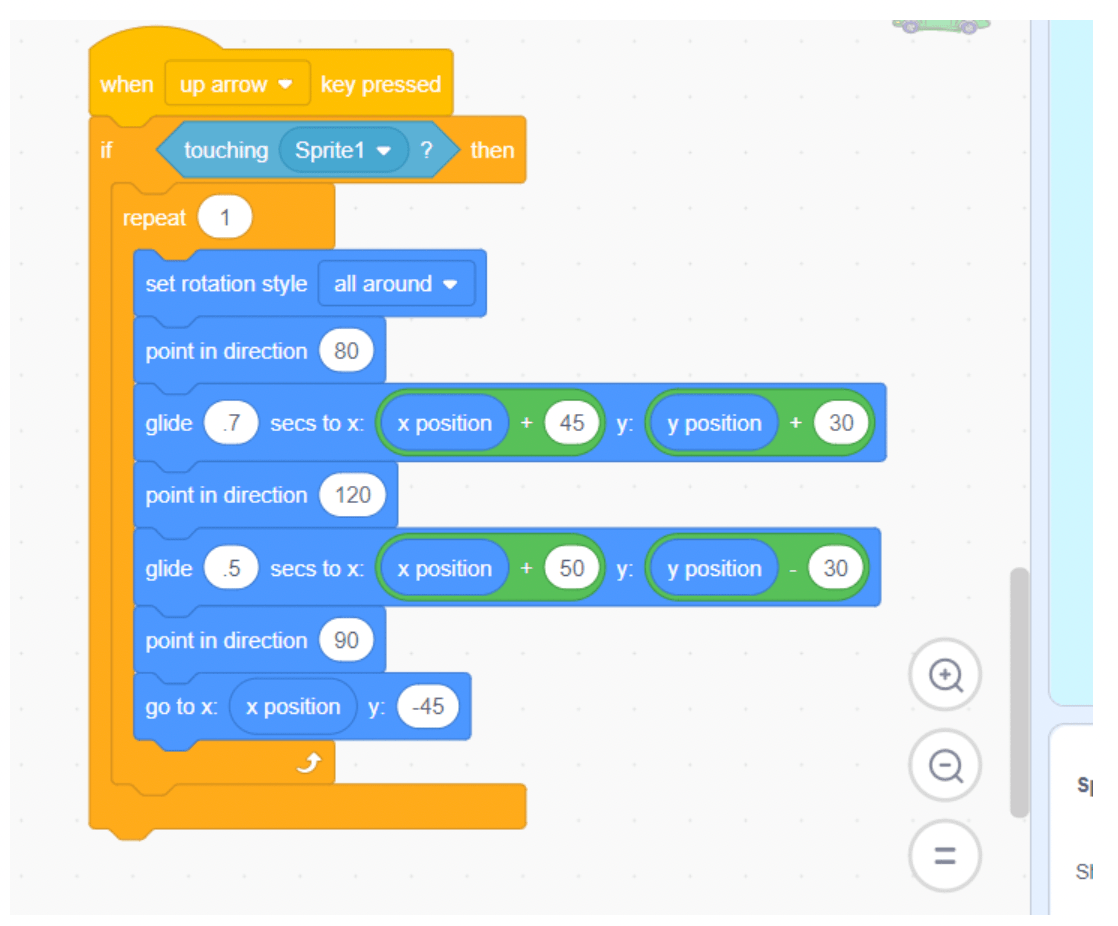
3. Go airborne or “jump” when the up arrow key is pressed
In this step, we will only focus on the right and left arrow keys and make them as simple as possible. Something to keep in mind though…would we want the car Sprite to be able to move left and right while in the air? The answer is no, but we will deal with that part later. The code below allows you to hold down the arrow keys and have them react accordingly.
STEP 6: Up arrow for the car to avoid falling to the “red-zone”.
When the up arrow key is pressed, we want to see the front of the car slightly lift off the ground and move forward a little faster than usual, as if it had a powerful accelerator. However, we only want to allow for this action while the car is on the ground and rolling. In other words, if the player does not press the up-arrow key in time, and the car is no longer touching the pathway Sprite, then it will sink, and the game will be over.
Similarly, we want to make this game challenging by restricting the car for going “airborne” every time the up arrow key is pressed (preventing users from just holding it down the entire game). In that case, we need to add some sort of a condition to our logic for the up arrow key. The rest can be done using simple blocks like glide to x y position. We can also use direction block to make the car appear like it is slightly pointed up at the time it goes “airborne”, and make it point down once it exceeds a certain height. This makes the game more advanced, and the player must know exactly when to utilize the up-arrow key.
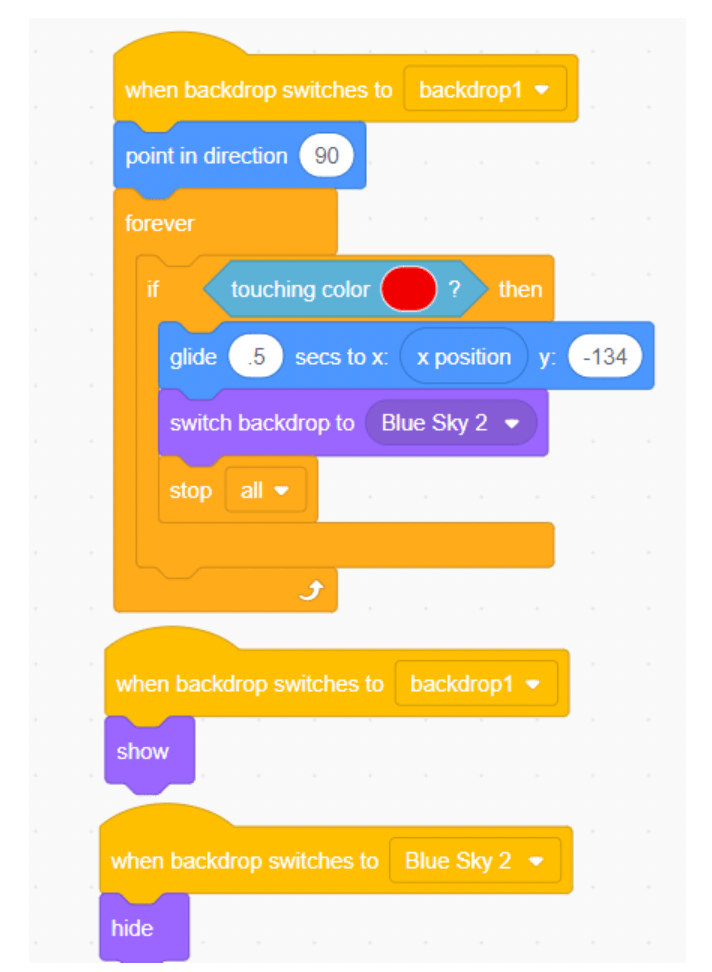
STEP 7: “Game Over” backdrop.
Before we get to the scrolling part of the game, let’s take care of a few other things. We want to think about what happens when the player doesn’t press the up arrow key and the car touches the red line. Here is the list of things that we want to see happen:
- Sink the vehicle to the bottom
- Switch backdrops and announce “Game Over”
- Hide all Sprites
- Show all Sprites when the game starts over
This is fairly easy to program in Scratch. Let’s start with the “sinking the car” part. We first want to check and see if the car is touching the red line. If so, we want to make it glid to the bottom of the canvas (screen) by selecting a low point of y axis. In our case, -134. Then we want to switch our backdrops to “Blue Sky 2” which is the backdrop we chose as our “losing” part. And to make them appear again, we’ll check to see if the green flag is clicked, and if so, we’ll switch the backdrops to our original backdrop or in our case “backdrop1”. We will use these two backdrops interchangeably, and hide Sprites when the backdrop is Blue Sky 2, and then make them show back up once the backdrop1 is on.
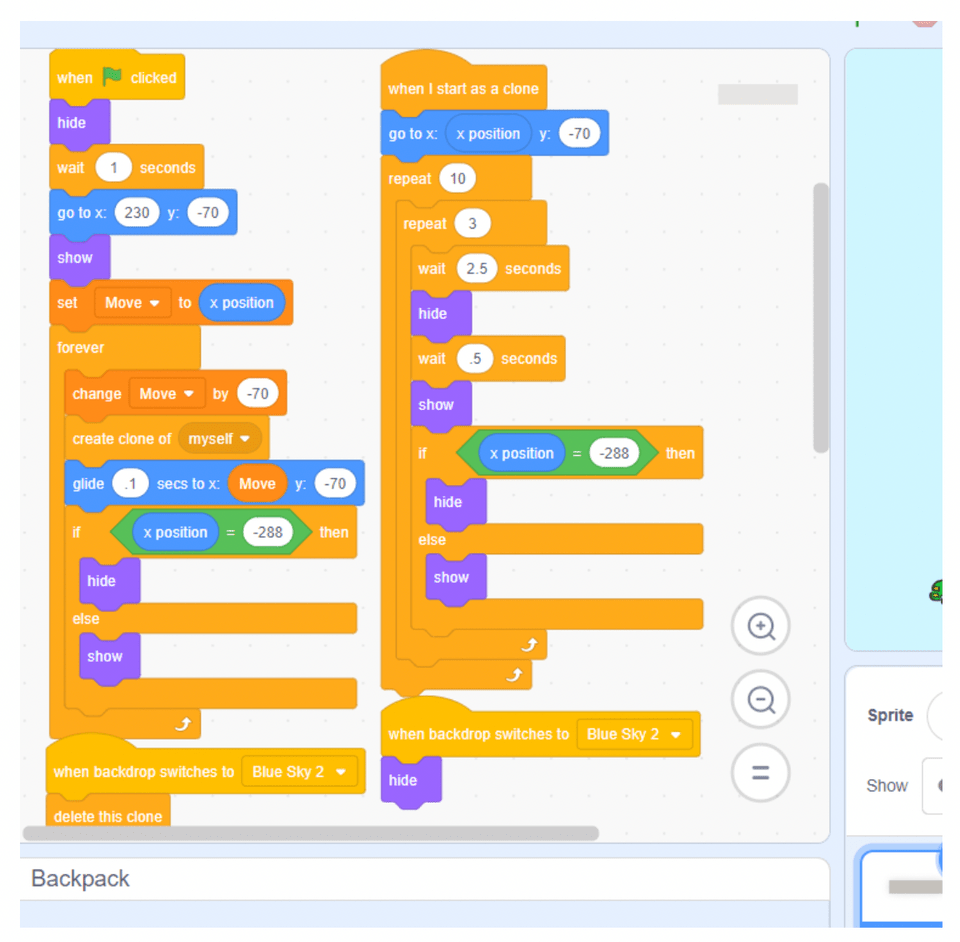
STEP 8: Program Pathway sprite.
We saved the best for last. It is time for the scrolling idea to come alive. For this to happen, we chose to go with the clone block and a variable we named “Move” track the x and y points. Basically we are going to clone our existing “pathway” Sprite and then attach the clone to the back of our original pathway Sprite, all the while, they are gliding right to left. The trick is to continue to make clones after that point which will result in a stack of clones that will automatically position themselves next of the previous clone before they start to glide.
The twist is to throw in a little bit of unpredicted behavior of this clone and glide process, by hiding then showing the Sprite. For that part, we will use a couple of repeat blocks and throw them inside of another repeat block, to make their patter less predictable.
The very outer repeat block can be replaced with a forever loop, and at that point, we can have a few more repeat loops inside, each holding in the code that will dictate how many seconds to wait until our clones go from “hiding” to “showing” phases which makes for a tricky scrolling look.
Creating a scrolling game in Scratch can be exciting, but you might encounter some common issues along the way. Here are solutions to help you troubleshoot:
1. Pathway Sprite Not Appearing or Scrolling Properly
- Issue: The pathway sprite does not appear or does not scroll smoothly across the screen.
- Solution: Ensure the pathway sprite is created and positioned correctly on the canvas. Check that you have used the “glide” blocks correctly to move the sprite along the x-axis. Make sure the “hide” and “show” blocks are placed appropriately to create the continuous scrolling effect. Adjust the timing and positioning of the clones to ensure smooth transitions.
2. Background Sprites Overlapping or Not Moving Smoothly
- Issue: The buildings and trees sprites overlap or do not move smoothly across the screen.
- Solution: Ensure each background sprite has its own unique starting position on the x-axis. Use different wait times for each sprite to prevent overlapping and create a smooth scrolling effect. Verify that the “hide” and “show” blocks are correctly placed to reset the sprite positions when they reach the left side of the screen.
3. Car Sprite Not Responding to Arrow Keys
- Issue: The car sprite does not move left or right when the arrow keys are pressed.
- Solution: Check that the “when right arrow key pressed” and “when left arrow key pressed” blocks are correctly set up as the event blocks. Ensure that the car sprite’s code includes blocks to change its x-position based on the arrow key inputs. Verify that the car sprite is not overlapping with other sprites or elements that might prevent it from moving.
4. Car Sprite Not Jumping Properly
- Issue: The car sprite does not jump when the up arrow key is pressed or jumps continuously.
- Solution: Ensure that the “when up arrow key pressed” block includes a condition to check if the car is touching the pathway sprite. This prevents the car from jumping continuously. Use the “glide” and “change y by” blocks to create a realistic jump effect. Adjust the timing and height of the jump to ensure the car does not fall into the red zone unless the player fails to press the up arrow key in time.
5. Game Over Screen Not Displaying Correctly
- Issue: The game over screen does not display when the car touches the red line, or sprites do not hide properly.
- Solution: Check that the “if touching color red” block is set up correctly to detect when the car sprite touches the red line. Ensure the “glide” block moves the car to the bottom of the screen when this happens. Verify that the “switch backdrop to” and “hide” blocks are used to display the game over screen and hide all sprites. Use the “when green flag clicked” block to reset the game and show all sprites when the game restarts.
6. Pathway Clones Not Aligning or Scrolling Continuously
- Issue: The cloned pathway sprites do not align correctly or do not create a continuous scrolling effect.
- Solution: Ensure that the original pathway sprite and its clones are positioned correctly on the canvas. Use the “create clone of” and “go to x: y:” blocks to position each clone next to the previous one. Verify that the clones glide together smoothly and adjust the timing and positioning if needed. Use the “repeat” blocks to create a continuous scrolling effect.
1. Sprites
- What Are They?: Sprites are the characters or objects in your Scratch project that you can control and animate. Each sprite can have multiple costumes and scripts associated with it. They are the main characters or pieces in your project.
- Usage in the Tutorial: Sprites like the car, pathway, buildings, trees, and shark are used to create the game’s visuals and interactive elements. They move, change appearance, and interact based on the player’s input and the game’s logic.
2. Backdrops
- What Are They?: Backdrops are the backgrounds of your Scratch project. They set the scene for your game and can change to reflect different levels or game states.
- Usage in the Tutorial: Backdrops are used to create the game’s environment and to display messages like “Game Over”. The initial backdrop provides the game setting, while the second backdrop indicates the end of the game.
3. Events
- What Are They?: Events are actions that trigger specific scripts to run. Examples include clicking the green flag to start the game or pressing arrow keys to move a sprite. Every code block needs to start with an event block.
- Usage in the Tutorial: Events like “when green flag clicked”, “when right arrow key pressed”, “when left arrow key pressed”, and “when up arrow key pressed” start the game, control the car’s movement, and handle jumping actions.
4. Control Blocks
- What Are They?: Control blocks manage the flow of your Scratch project’s scripts. They include loops, conditional statements, and event handlers.
- Usage in the Tutorial: Control blocks like “forever”, “repeat”, “if then”, and “when (key) pressed” manage the game’s continuous scrolling effect, check conditions (e.g., if the car touches the red line), and handle user input.
5. Motion Blocks
- What Are They?: Motion blocks control the movement of sprites. They can change a sprite’s position, direction, and speed. They are always going to be the blue category.
- Usage in the Tutorial: Motion blocks like “glide”, “go to x: y:”, and “change x by” are used to move the car, pathway, and background sprites to create the scrolling effect and the car’s movements.
6. Sensing Blocks
- What Are They?: Sensing blocks detect various conditions and interactions in your Scratch project. They can sense touch, colors, distances, and other conditions.
- Usage in the Tutorial: Sensing blocks like “touching color” are used to detect when the car sprite touches the red line, triggering the game over sequence.
7. Variables
- What Are They?: Variables are used to store data that your Scratch project can use and modify. They can hold numbers, text, or other types of information.
- Usage in the Tutorial: Variables like “Move” track the position of the pathway sprite and help manage the continuous scrolling effect by storing x and y coordinates.
8. Looks Blocks
- What Are They?: Looks blocks control the appearance of sprites and backdrops. They can change costumes, switch backdrops, show or hide sprites, and more. They are always going to be the purple blocks.
- Usage in the Tutorial: Looks blocks like “switch backdrop to”, “show”, and “hide” are used to change the game’s backdrop, display or hide sprites, and create visual effects when the game starts or ends.
9. Cloning
- What Is It?: Cloning allows you to create copies of a sprite that can act independently of the original. Each clone can have its own scripts and behaviors.
- Usage in the Tutorial: Cloning is used to create multiple instances of the pathway sprite, which move in sequence to create a continuous scrolling effect.
Taking your scrolling game to the next level can be both fun and rewarding. Here are three advanced tips and enhancements to make your game even more exciting and engaging:
1. Save the Game State
Saving the game state allows players to resume their progress the next time they play. This feature is particularly useful for games with levels or high scores.
- How to Do It: Use variables and the “Cloud Data” feature in Scratch to save and load game data. Display the high score on the screen using a variable display.
2. Add Sound Effects and Music
Sound effects and music make the game more immersive and engaging.
- How to Do It: Use the Sounds tab in Scratch to add sound effects and background music to your game. For example, upload or select sound effects from the Scratch library for actions like jumping, crashing, or scoring points. Or add background music to play continuously during the game.
3. Incorporate More Complex Animations and Interactions
Complex animations and interactions make the game visually appealing and dynamic, adding depth to the gameplay.
- How to Do It: Use multiple costumes and broadcast messages to create advanced animations and interactions. Animate the car sprite to show different actions, create obstacles that the car must avoid, and add power-ups that provide temporary boosts or effects.
You might also be interested in this video on how to make a scrolling background:
Now you know how to improvise commonly used blocks, such as glide, clone, hide, show, etc., and build a sophisticated scrolling game. With little effort and a clear-cut objective, we have accomplished a lot. In other words, it is the logic behind the code that drives and simplifies complexity. An idea, plan, and creativity are all part of logic, and when combined, great apps are built. Up next, see how to make a clicker game on Scratch.
To make more fun Scratch games join Create & Learn’s Scratch coding for kids classes or advanced Scratch programming for older children, designed by experts from Google, Stanford, and MIT. There’s even a free intro session, so there’s no risk in trying!
PakarPBN
A Private Blog Network (PBN) is a collection of websites that are controlled by a single individual or organization and used primarily to build backlinks to a “money site” in order to influence its ranking in search engines such as Google. The core idea behind a PBN is based on the importance of backlinks in Google’s ranking algorithm. Since Google views backlinks as signals of authority and trust, some website owners attempt to artificially create these signals through a controlled network of sites.
In a typical PBN setup, the owner acquires expired or aged domains that already have existing authority, backlinks, and history. These domains are rebuilt with new content and hosted separately, often using different IP addresses, hosting providers, themes, and ownership details to make them appear unrelated. Within the content published on these sites, links are strategically placed that point to the main website the owner wants to rank higher. By doing this, the owner attempts to pass link equity (also known as “link juice”) from the PBN sites to the target website.
The purpose of a PBN is to give the impression that the target website is naturally earning links from multiple independent sources. If done effectively, this can temporarily improve keyword rankings, increase organic visibility, and drive more traffic from search results.